Before writing a minimal sample for some technology, I usually take the time to see if there already exist one on the net. For a simple example that illustrates how to combine Qt and OpenCV I found the following post. Just download the project at the end of that post.
This post explains compiling the sample code using Qt Creator.
Mac OS/X ∞
In previous posts, I’ve mentioned how to install Qt and OpenCV on the OS/X by manually downloading and building them, however, the shortest route to get the above sample to compile and run on the Mac is to install Qt and OpenCV as follows:
brew install opencv
brew install qt
if you get errors during one of these installations, look at the message – its usually solvable by adding write permissions to the folder mentioned in the message. Note that its best that you uninstall any previous versions of Qt and OpenCV prior to doing that.
The ShowImage sample also requires pkg-config which is not installed by default. For that simply
brew install pkg-config
Again the above works great and saves you manually installing all the dependencies of pkg-config.
At this point, launch Qt Creator, and open the project ShowImage.pro
When you build the project you could get the following error during the build:
sh: pkg-config: command not found
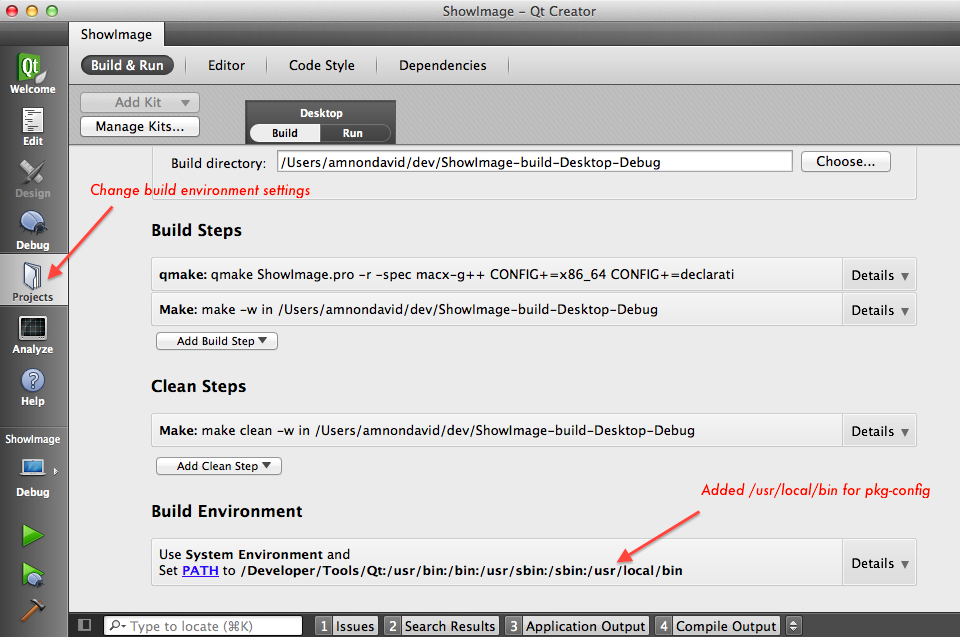
At first I thought it was strange since invoking pkg-config from the command line worked, so it was definitely in the search path (which was confirmed by invoking which pkg-config from the command line). After some searching I realized that Qt Creator does not use the shell path to look for pkg-config. In order to let Qt Creator know where to find pkg-config you should explicitly add the path to the build environment by clicking the Projects icon on the left and adding the path the pkg-config in the Build Environment details (see below).

On Ubuntu ∞
Loading and compiling the ShowImage.pro in Ubuntu had it’s own problems. Compilation failed with an error of
bits/predefs.h: No such file or directory
which was somewhere along the include tree required by Qt4.
I found the answer to this here and a sudo apt-get install gcc-multilib solved that compilation issue. This seemed strange since my ubuntu is a 32-bit installation and this solution was to install 32-bit headers on a 64-bit system – but for the time being I let that slide. However this left me with this new hurdle:
moc_mainwindow.cpp:14:2: error: #error "This file was generated using the moc from 4.7.3. It"
moc_mainwindow.cpp:15:2: error: #error "cannot be used with the include files from this version of Qt."
moc_mainwindow.cpp:16:2: error: #error "(The moc has changed too much.)"
A solution for this was explained by Anjum Kaiser here and indeed a
make distclean
qmake
make
from the command line resulted in an executable that worked.
However I wanted to make sure I can build a working executable from Qt Creator and attempting to build the project from Qt Creator after make distclean from the command line, returned the following error:
libopencv_calib3d.so: could not read symbols: File in wrong format
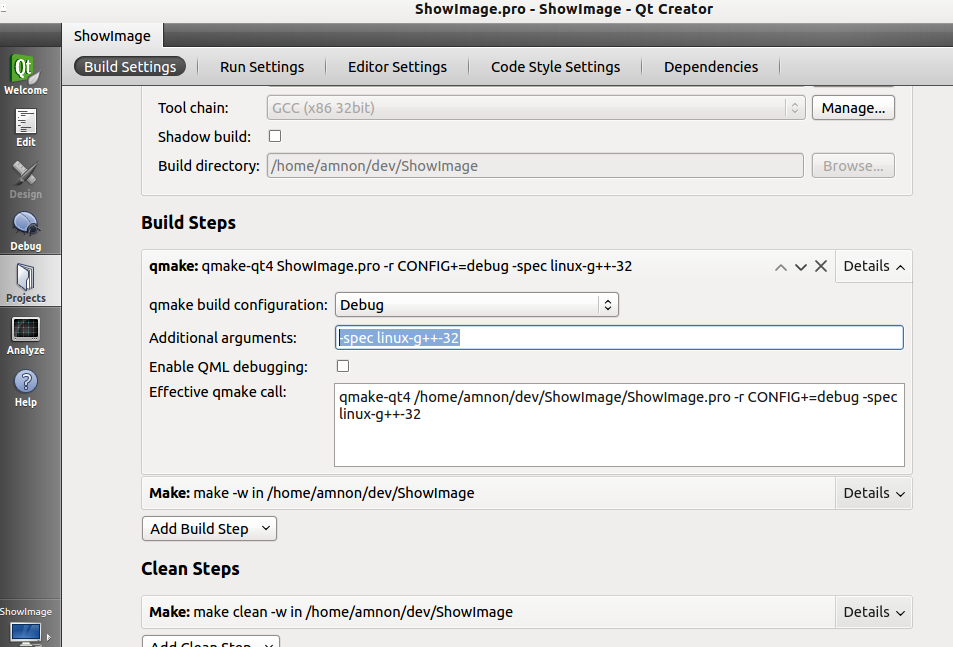
This got me thinking about the 32-bit/64-bit issue and it dawned on my that Qt Creator might not be building the project the same way it is built from the command line. A quick look in the Qt Creator projects configuration showed that indeed g++64 was specified instead of g++32. Fixing this (below) enabled smooth compilation.

However – when attempting to run the app – yet another surprise:
error while loading shared libraries: libopencv_highgui.so.2.4:
cannot open shared object file: No such file or directory
a locate libopencv_highgui.so (remember to sudo updatedb first) showed that the library exists at /usr/lib but the loader doesn’t know about it. The next step was then sudo vi /etc/ld.so.conf, adding /usr/lib to the end of the file and finally sudo ldconfig.
This, finally, did the trick and the app could be successfully compiled and launched from within Qt Creator on Ubuntu 12.04